Friday, March 16, 2012

Creamy Mushroom Soup


It is a grey and gloomy day here in London, so are the pictures in this post. Mushrooms are a big part of my diet especially chestnut and portobello mushrooms are the ones that I use probably the most. But shitake mushrooms are my favorite in terms of taste and texture. I used to make this soup with shitake mushrooms back in States as they were available in local grocery store all year long. But they are harder to find in London at least in my local grocery store. So I used button and oyster mushrooms instead. It is a very tasty soup and I highly recommend you to try this recipe if you are a mushroom fan like myself. I have been making this soup since 2008 and the recipe is originated from the blog called Ev cini.

Oyster mushrooms, button mushroom, Spanish onion
Chopped onions and mushrooms sizzling with olive oil
Mushroom soup with toasted bread 
Ingredients (4 serving):
  • 10 button mushrooms
  • 12 oyster mushrooms
  • 500 grams of warm/room temperature milk
  • 500 grams of warm water
  • 4 tbsp olive oil 
  • 4 tbsp flour (i used self raising)
  • 1 medium size spanish onion 
  • 1/2  tsp freshly grounded black pepper
Recipe
  1. Finely chop the onions
  2. Chop the mushrooms in small sizes 
  3. In a non-stick pan/pot caramelise the  onions with 2 tbsp olive oil 
  4. Add the chopped mushrooms to the pan 
  5. Let them cook until the mushroom juice is evaporated (at this point mushrooms should be more brownish and much smaller in size)
  6. Take the cooked mixture out of the pan
  7. To an empty pan (i recommend non-stick again) add 2 tbsp olive oil and 4 tbsp flour
  8. Cook it in low by stirring until the flour looks tanned
  9. Add the cooked mushroom and onion mixture to the pan with flour 
  10. Add the black pepper and keep stirring
  11. Add the milk slowly to the pan and stir heavily, bring the stove to boil
  12. Add the  warm water
  13. When the soup is boiled serve it to the bowls and add some chopped parsley on top 

Thursday, March 15, 2012

Ricotta Cheese and Three Fresh Herb Muffin

In this post i decided to let the picture speak about the food. The savory muffins were delicious and i used the ricotta cheese i bought from La Dolce Vita Italian Fair. I will write more about it soon in another post. Now enjoy the pictures and scroll down for the recipe. 
Cooked savory muffins
Step by Step Muffin Dough: thyme leaves, sun flower seeds, muffin dough.
Dry ingredients with three herbs
Savory muffins at the silicone hearth shaped muffin tin
Savory ricotta and three fresh herbs muffins

Ingredients: (yields 8 - 12 muffins)
  • 2 cups self raising flour
  • 1 cup yogurt 
  • 100 grams of ricotta cheese (about 1/3cups)
  • 1/3 cup sun flower seeds
  • 4 tbsp olive oil
  • 1 tbsp baking powder
  • 1 tbsp apple cider
  • 1/2  1/2 tsp salt 
  • 1 egg 
  • 6 branches of fresh basil (finely chopped )
  • 6 branches of dill
  • 12 branches of fresh wild thyme
Recipe:
  1. Wash and chop the fresh herbs (for thyme tear the leaves and throw away the rest) and set them aside for drying or towel dry them 
  2. Toast the sun flower seeds with 1/2 tsp salt 
  3. Set your oven to 360 F/180 C and grease or line your muffin tin 
  4. Leave the salt at the pan and take the toasted sun flower seed out to a bowl
  5. Add the flour, baking powder, salt to the bowl mix it lightly
  6. Add the finely chopped basil, fresh thyme, and finely chopped dill to the dry mixture and lightly mix it  
  7. Crack the egg to another bowl and add the apple cider beat it with a whisk 
  8. Add the yogurt and keep whisking
  9. Add ricotta cheese to the liquid mixture and keep whisking
  10. Add the liquid mixture to dry mixture just mix it with a spatula until the flour disappears (do not over mix it) and spoon it to the muffin tins  (this mixture still will be more dense than your regular fluffy muffin dough)
  11. bake it for 15-30 mins mine took 20 mins

Wednesday, March 14, 2012

Stuffed Peppers: Turkish Style

Stuffed vegetables are one of the main and probably the most consumed  and loved dish in Turkish households. It can be stuffed in many different ways, as you wonder through the country, trying stuffed vegetables from different regions you can see many variations. Two main difference everywhere in the country is either stuffing them with ground meat filling or just with vegetarian filling. The meat filling can have different spices and also rice in it. My favorite is the one without meat so called "zeytin yagli". Another main distinction in this dish is stuffing either dried vegetables or fresh ones. In my opinion, if you are stuffing fresh vegetables i think you should make it vegetarian and for dried vegetables using a meat filling is a better option. Make sure you put loads of fresh dill when you are using meat in the filling. Vegetarian filling can be just rice and spices or in addition to that it can have pine nuts, sugar, and small sized dried grapes.  
Uncooked stuffed peppers 
In Turkey the most common stuffed vegetable is pepper, unlike Europe or US Turkey has smaller, crunchier, and of course better tasting peppers. So the size of the stuffed vegetable is much smaller sometimes it can even be a bite size. The second most popular vegetable is zucchini (courgette), and i think the third would be the dried eggplant (aubergine). Usually my mum throws couple of stuffed tomatoes into whatever stuffed vegetable she is  cooking. But if you are planning to do so as well i would advise you to use the oven. I will come to that in how to cook the stuffed vegetables. After stuffing the vegetable we usually close the top of the vegetable with a piece of tomato this will help you keep the stuffing inside the vegetable and the sour tomato will leave a beautiful flavor.

Another way of making stuffed vegetables is using grape leaves it is very common even in England you can find stuffed grape leaves but it is never as good as your mum's stuffed grape leaves if you are Turkish, Middle-eastern, or Greek . My parents usually stuff the grape leaves with vegetarian filling and it can be eaten cold or warm. When my grandmother or my mum is using meat filling they stuff the cabbage leaves. In the western part of the country around Aegean sea coast it is popular to stuff the pumpkin/zucchini flowers. 
Cooked stuffed pepper
The cooking is both straight forward and tricky. I usually boil them some people cook them in the oven which make sense if you are especially using tomatoes.  You don't want to overcook them the rice should be  still in good shape. I haven't manage to cook them perfectly yet but i will let you know when i do so. I will give you one i learned from my mother, if you are using fresh grape leaves and you want them to look green after cooking you want to slice lemons when you are boiling them. 

Tuesday, March 13, 2012

Recipe test with Behice Unal: Lemon & Popyseed Muffins

Behice shares her experience with us on baking the Lemon & Popyseed (L&P) muffins. Behice described her love for baking and shared the beautifully taken pictures of the delicious L&P muffins she baked. I would like to thank her for sparing the time on taking pics and writing her opinion on baking and L&P muffins. Also special thanks for trusting the recipes on this blog. Here is what Behice says: 
Hey guys!  :)

well... I dont have a blog but do follow blogs including Tuba's :) and the lovely recipes she posts with the pictures

I enjoy coooking as well...actually i prefer baking instead...well lets say a bit of both shall we? :)....I am a muffin person...sorry :| that didnt make sense did it? well... erm i like baking muffins  :) and have tried a lot from my hummingbird book. spinach and cheese and blueberry muffins are my fave i have to say ;).... 
Skimming through tuba's blog: I've found the lemon and poppyseed one...as I'm a lemon lover tooo!! i had to try it out!... 

I've used the exact ingridients, well i didnt have coconut oil so i used a bit of butter...and 3/4 of golden caster sugar instead. And used 3 lemons instead of six but i will try 6 lemons next time. 
Plus: i never knew we can add yogurt into muffins!...  :)) 
results: well... i had visitors at home and offered them some of the muffins: (compliments to the chef :D ) they loved it! not only the visitors but also my BUDGIE! who kept flying to the muffins and trying to have a taste (ofcourse i didnt let him! his not allowed sugary stuff) :)) well although they were not too sugary or fatty :)

but yeh.... thanks Tuba for sharing ur yummylicious 'try this at home!' recipes :)) I'm sure i will be trying other recipes she has posted

ooooh...and i do recommend u try out he spinach and cheese from hummingbird bakery...i'm sure they will have it online....


Behice used the silicone liners to bake her muffins

Monday, March 12, 2012

Glazed Vegetables Revisited

Baby potatoes, bugs-bunny carrots, bird eye chili, lime, and lemon
Pinterest is a great website to roam around and get some ideas on how to make and be creative with cooking/baking. When i was checking the pins added by the people i followed on pintesrest i came across to a beautifully taken picture of glazed carrots. They glazed the carrots with olive oil, cumin, and lime. It was so beautiful so i decided to make my glazed vegetables with lime juice as well. 

Glazed vegetables with olive oil lime juice and bird eye chili
When i was on my everyday grocery shopping i saw the carrots as my friends calls the bugs bunny carrots and i picked them up to make glazed vegetables.  i cleaned them get rid of the green part and boiled them and boiled baby potatoes with skin on. once the carrots are boiled then it is easy to peel the skin of the carrots. I peeled it because it is more shiny and the color is more vibrant on the inside. Then i lined my tin with baking paper, added some bird eye chili (it is extremely hot use it with caution), olive oil, sea salt and left them at 350 F /180 C in the oven. And for potatoes i used the same procedure but left the skins on and cut them in  half. After 15 mins i took both of the vegetables out and added lime juice and finely chopped parsley on top of the veggies. It was looking good and tasting good as well :) Highly recommended. 

Glazed baby potatoes with bird eye chili, parsley, and lime juice


Friday, March 9, 2012

Chocolate Chip Cookies

Choclate Chip Cookie Dough Chilled in the Fridge for 24 Hours
I would like to start by expressing my graditude to Esma for making the beautifully taken pictures possible. 
We all have a love relationship with chocolate from early ages. I can't recall the first time i met chocolate but i remember the big box of chocolates with hazelnuts that my parents used to keep in somewhere i can not reach. As years go by, i started to fell apart with chocolate and still unless it is not orange flavoured i don't really have much affection for it. I am now trying to re-establish my relation with chocolate by following the path led by artisan bakers. Although the chocolate chip cookie sound like a not so serious step for my ambitions on chocolate, I believe that on anything in life you have got to get the fundamentals right to move forward. So if you can do the fundamentals perfectly, then you can add on it. 

Chocolate Chip Cookie Truffles
According to the NYT article the chocolate chip cookie is coming from a local baker living near Boston, Mass and since then it has been the regular item on bakeries and your local coffee shop. Even the packaged versions are sold in the selves of the supermarkets probably packed with loads of preservatives. In the NYT article they interviewed with several bakeries and try to understand the  best technique used to make the perfect cookie. According to the article the secret is chilling the dough! 


Chocolate Chip Cookies
I used the recipe given in Cafe Fernando because it was using the least amount of eggs that I could find on the internet. I used a mixture of chocolates to make the cookies including the leftovers from the strawberry tuxedo recipe so there was white chocolate, milk chocolate, dark chocolate. Later on, when I was eating the cookies, I would say I like the taste of the white chocolates probably the most. So next time i am baking cookies, I will try to use the cocoa in the dough and use only white chocolate chuncks. The cookies turned out pretty good crunchy on the outside and inside is moist and chewy. I think I kept them in the oven a bit long. I think it would be more chevy if I took the tray out when the cookies were melted and still looking white and fluffy.


Chocolate Chip Cookies
Ingredients (makes 20 cookies)
  • 2 cups all-purpose flour
  • 3/2 tsp. baking soda (you can use less, loads of it makes the cookies bitter)
  • 1 tsp. salt
  • 1 cup butter at room temperature
  • 1 cup sugar
  • 1/2 cup brown sugar
  • 2 eggs
  • 2 tbsp of vanilla powder 
  • 1 1/4 cups chocolate chunks


  1. Put the butter in a bowl and add the sugars and beat it with an electric mixer in high.
  2. Add the eggs mix until you get a  creamy textured mixture. 
  3. In another bowl mix the dry ingredients.
  4. Add the dry ingredients to the wet while beating with the electric mixer
  5. Add the chocolate chunks and fold them into the dough with the help of a spatula. 
  6. Refrigerate the dough 24 to 36 hours or more.
  7. After 36 hours set the oven to 360 F /180 C, line your baking tray and take the dough out and make truffles out of it. 
  8. Leave generous amount of space between truffles and bake 10-15 mins. 
  9. The cookie should be still fluffy, soft, and tanned a little or white when you take out of the oven.


Wednesday, March 7, 2012

Strawberry Tuxedos and Strawberry Selection


Lately I have been trying to make cookies, cakes, frozen bananas involving or covered with chocolate. After this experience I would say I am not the biggest fan of chocolate.  I am a fruit fan, veggie fan, naked food fan but chocolate is not in that list. However I like to combine chocolate with berries and I like using chocolate in cakes. When doing so I think it is important to use the best chocolate I can find. I used green black organics for this particular recipe but you can alternate it with some other favorite brand of yours. I have to make an exception for divine orange flavored milk chocolate i would say it is my favorite. I have strong feelings for the orange flavored milk chocolate, I must admit.


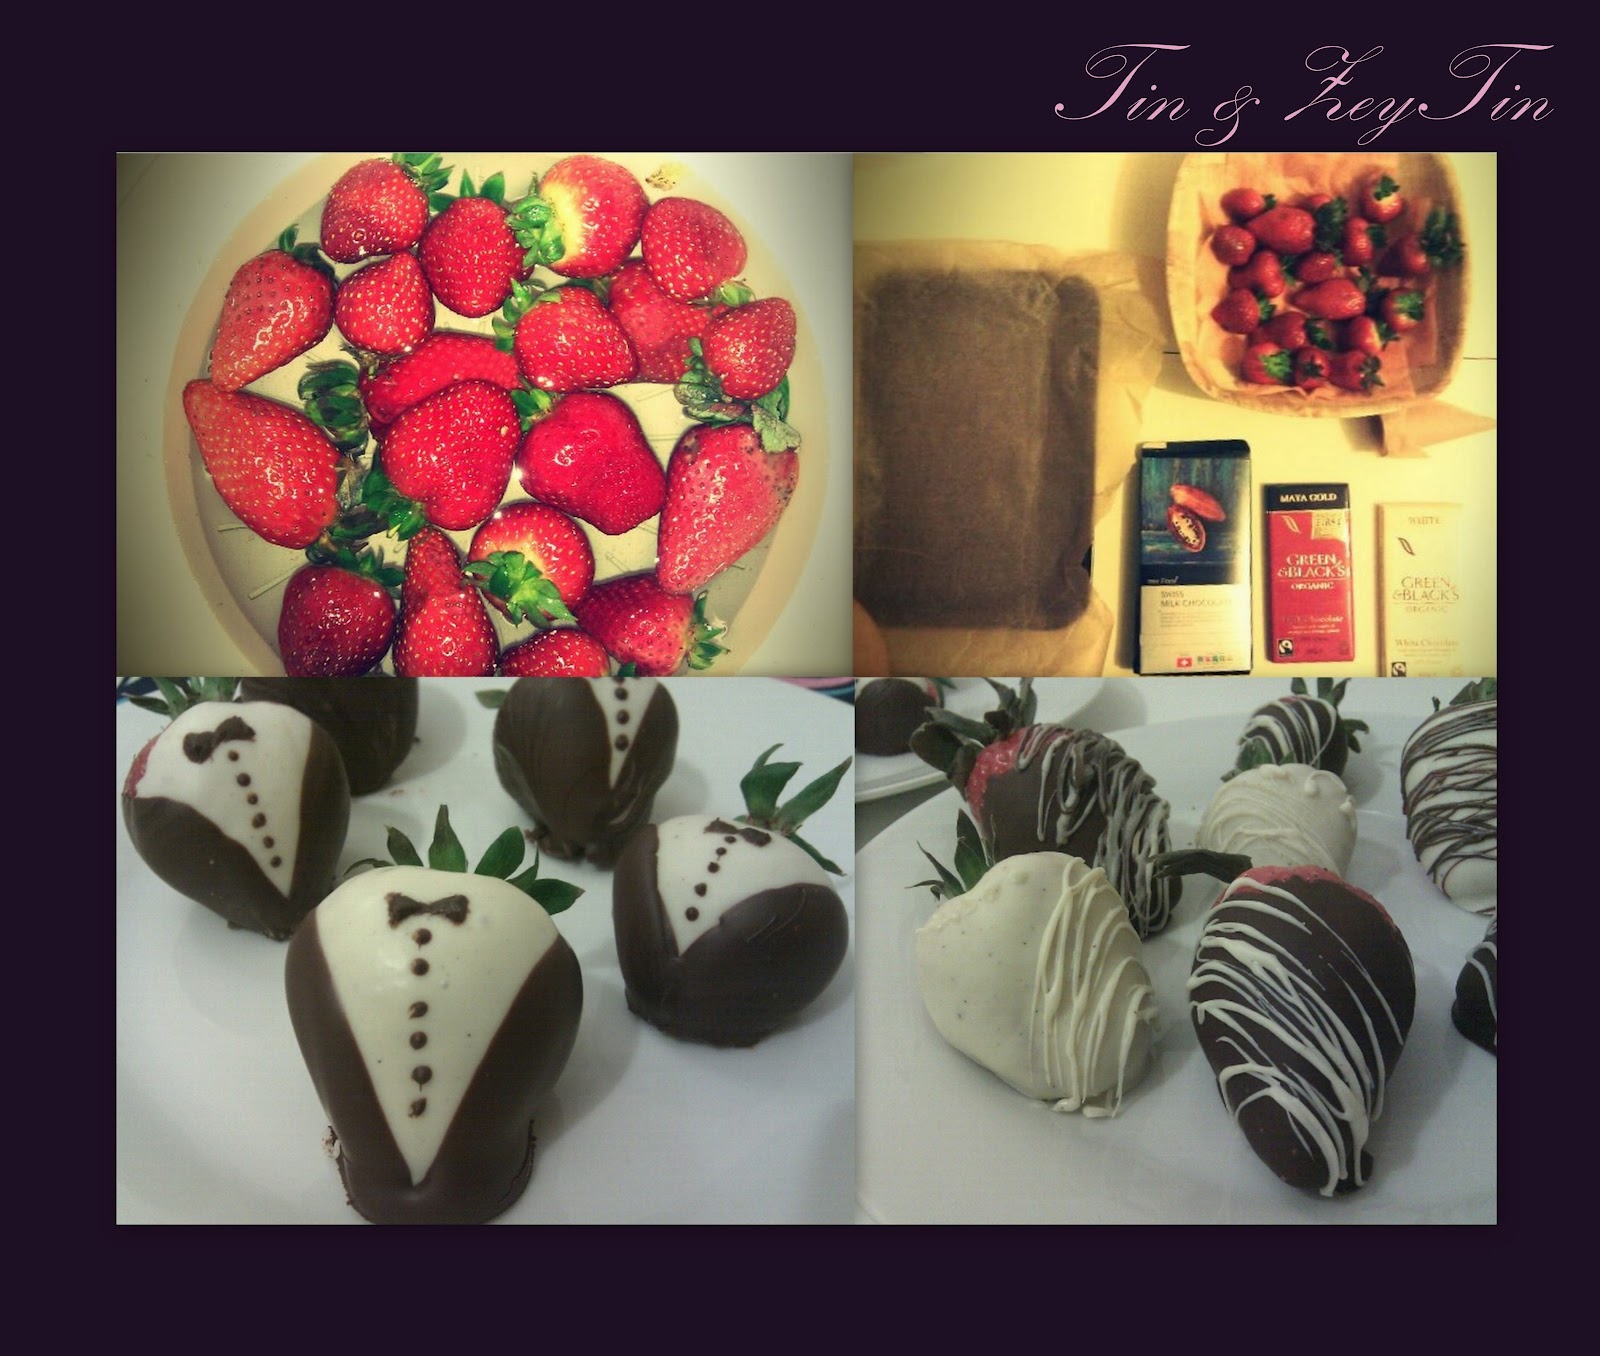
On the weekend my friend and I went to church street and whole foods happened to have the Spanish strawberries (250 grams for 99p). The strawberries were massive so we didn't want to buy it in the first place but the smell and the free tasters tricked us so we ended up buying some. I wasn't planning to try anything new with them but roaming around pinterest I saw this (shown left) gorgeous strawberries covered with white chocolate and dipped into blue crystal sugar, they looked absolutely amazing. Then I ended up in a grocery store picking up chocolates but couldn't find beautifully colored sugar crystals. By the way it just down on me that this strawberry features the colors of French flag. Oh well... 

There are plenty of blog posts/videos available on the web showing how to cover strawberries with chocolate and many of other things such as coconut flakes, different sugar crystals but I think the chocolate itself looks very elegant and you can be creative with it. I have found a nice video on YouTube showing how to make strawberry tuxedos. This gentleman explains very well how to melt chocolate in a microwave, how to make a disposable paper cone from baking sheet and how to dress Mr. strawberries with tuxedos.  All of them are recorded in three different YouTube videos i am giving the links since the embedding of the videos are disabled. 

For paper cone:
For dressing the berries: 


Recipe: (makes 5 tuxedos, 7 selection berries)

  • 100 grams of white choclate
  • 100 grams of 50% dark choclate 
  • 11  good sized strawberries (take 3-4 strawberries extra incase you can not get the hang of it in first place  )
  1. Wash the strawberries and lay them on a paper towel and leave them on for 15-20 mins make sure the strawberries are dry before you start working on them. 
  2. Chop the chocolates and put them in two different bowls. 
  3. Melt chocolates in microwave at 50% power by stopping the microwave and stirring every 30 seconds. You do not want to burn the chocolate so it is very important to check every 15-30 seconds making sure it is melting without getting burned. 
  4. For tuxedos dip one side of the strawberry to white chocolate then set it in a tray covered with baking sheet. 
  5. Once you are done dipping to white chocolate refrigerate the tray for about 2-3 minutes. 
  6. When the white chocolate is nice and firm take them out of the fridge and dip both sides to dark chocolate then with the help of a cocktail stick draw the buttons and the bow-tie.
  7. For the selection dip them into the chocolate, let them rest in the fridge and fill the paper cone with melted chocolate of your choice.
  8. Squeeze the paper cone from back like a toothpaste tube and draw lines with the chocolate as it pours from the tip of the cone. 
  9. Try to eat them in the same day otherwise keep them in the fridge the strawberries get spoiled easily.