Sunday, April 29, 2012

London Coffee Festival

As a coffee lover I was very excited for the London Coffee Festival event. I learned about it last year, on my way to school, back then i used to walk to school, I stopped by in pavilion coffee shop to get a good cup of coffee. London Coffee Festival had an add on the coffee cups and i deiced i would go this event. I couldn't make it last year, and this year i booked my ticket and went there wandered two and a half hours  in old truman brewery. Unfortunately it turned out to be not what i expected.  I was expecting to enter a space with full of coffee smell and loads of free coffee samples after all there is 800 different kinds of coffee flavors in the world now.  


There was a queue in front of the festival entrance at 10:30 am and we waited around 10 mins to go in which was very unpleasant since it was raining and very cold. Then i was a bit disappointed since there was Thai food  stands in the downstairs (the festival turned out to be in upstairs) so you can imagine the smell it was nothing like the coffee smell that i expected. And the second very upsetting thing was the people on the stands are usually way to cool to speak with or just way to mean to offer a free sample from their products. So i am not going back to London coffee festival next year if i will be in London because it is way too expensive for what it offers. The single standard ticket costs £9.50 and plus £1.25 booking fee then if you buy it on the door it is more expensive around £12. And one more annoying thing about the ticketing is you can not really go there whenever you want so there is a time slot that you can go in and you can not go back in again. So it is very annoying in that sense. I think it wouldn't worth to pay more than £5 for this event and i am very dissatisfied with it. Thankfully i managed to get something out from the workshops and i stopped by at the  make decent coffee lounge where they showed how to make a filtered coffee. 


Certainly in an event on coffee you get to see loads of equipment used  for making coffee both filters, espresso machines,  coffee cups, french presses. I didn't take loads of pictures it was crowded in front of the stands. The first workshop i attended was on tea, apparently tea tastes different depending on the altitude that it grows in. And the size of the tea is very important, just like in coffee, if the tea is very fine dust like that means it is going to infuse to water very quickly. So the instant tea that is on the most of the English pocket teas are dust like that is why it gives color very quickly. The smell of the tea also significant when choosing. The tea that has grown in low altitude doesn't have an intense flavor and the flavor fades away very quickly. If it has a high percentage blend of high altitude grown tea the strength of the flavor is intense and then again fades away quickly. if it is composed of mid altitude grown tea than the flavor is intense and it lasts long time this type of tea is coming probably to England from Rwanda. We had some tea with milk since it was a sensory lab but didn't tastes much different. Personally my favorite is large cut teas, i do not like the dust like teas i think they usually don't have much flavor into them probably low altitude ones that is been sold on the supermarket shelves. 


My next stop was the make decent coffee lounge, where i learned the art of filter coffee making, they actually have a  video on youtube on how to make filtered coffee at home (above).  There was a hario V60 coffee maker also featured in the video above, also chemex coffee maker, and a french press. For Chemex and hario V60 you need a paper filter. You have to place the paper filter into the upper part and wet the paper to not to let the taste of the paper affect the taste of the coffee. Then you have to grind the coffee beans , i had a very strong Tanzanian blend in the lounge, and pour 15 grams for each cup into the wet cone.  Then pour the boiled water into the hario v60 coffee drip buono kettle and fist pour some on the coffee and wait a while this will allow the CO2 to be released from the coffee. Then add the remaining water and wait for it to be filtered. The v60 kettle has a long thin and curved opening which will allow the water cool down while pouring on to the grinned coffee. It is pretty straightforward but unfortunately a chemex coffee maker costs $38, a v60 coffee maker costs $31, and the hario kettle costs $56. So the equipment is quite expensive. But i think it is worth if you are a coffee lover. I will continue on writing on the sessions in the next blog post, hope you had some useful information on coffee. Tune in for the rest of the post. 


Saturday, April 28, 2012

Summer Tabooleh

Tobooleh comes in all sorts of forms and one can certainly modify the ingredients. I am big fan of fresh herbs and tabooleh is one of my favorite salad. During winter i used to make it with pomegranate  the recipe i have got from the famous food blog evcini. And my friend told me she added some walnuts into her recipe. I added walnuts to this recipe but i am not very satisfies with the walnuts because i think walnuts should be combined with more wheat than greens. The intensity of green herbs made the walnuts almost invisible. So i think if you are planning to use walnuts then the tabooleh should be made with loads  of pomegranate and wheat and minimal amount of fresh herbs loads of walnuts.


Ingredients:

  • 1 big bundled bunch of flat leaf parsley
  • 1 big bundled bunch of dill
  • 1/2  bundled bunch of fresh mint
  • 1 cup of thin bulgur 
  • 1 3/4 cups of hot water 
  • 1/4 cup of pomegranate syrup
  • 1/4 cup 1 tbsp olive oil 
  • 1 tsb salt 
  • 1 lemon's juice;
  • 1/3 cup of chopped walnuts (optional)
Recipe:
  1. combine the hot water and bulgur (cooked wheat/bulghur)
  2. wait until it cools down and while waiting wash the greens well add salt and make them wait in the salty water if necessary 
  3. then finely chop the greens 
  4. combine the cooked wheat/bulgur,  pomegranate syrup and mix it well.
  5. mix the greeans and wheat and add the walnuts mix it well. 
  6. add the salt and olive oil and serve. 

    Friday, April 6, 2012

    Fudgy Brownies: coffee flavoured

    These are great brownies they dont taste like butter or biscuit when you eat and my friends would ask me does this have coffee in it. My intention by adding coffee was to bring out the chocolate flavour not to make the end user feel the coffee. But it turned out great the taste contrast between coffee and chocolate works quite well. And make sure you line your tin before pouring the mixture and leave some extra baking paper on the sides this will help you to pull out the brownies after baking. Also you can spray your tin with oil before lining that will help the baking paper to stick on the inner surface of the tin.


    Ingredients:

    • 1 egg
    • 100 grams of bittersweet chocolate (I used 85%)
    • 100 grams of milk chocolate
    • 200 grams of chocolate is when chopped in small chunks 1 1/3 cup chocolate
    • 4 tbsp very strong coffee
    • 1 Cup of Granulated Sugar
    • 6 tbsp butter
    • 4 tbsp coconut oil
    • 3 tbsp olive oil
    • 2 tbsp cocoa powder
    • 3/4 cups flour
    • ¼ tsp of Salt
    • 10 grams of vanilla powder (you can use vanilla extract)


    1. Line your brownie tin with a baking sheet to make the sheet stick to the tin spray your tin with oil before lining.
    2. Set your oven to 180 CC/360 F.
    3. Melt the chocolate in a bowl by placing the bowl on top of a pot with  boiling water.
    4. Mix the room temperature butter, coconut oil and olive oil and sugar with a whisk until sugar and butter are incorporated do not use an electric mixer you don't want to end up with a foamy texture brownies should be dense.
    5. Add the egg to the mixture and keep beating with the whisk
    6. Add the coffee and vanilla powder keep beating
    7. Add the flour and cocoa powder whisk until everything is incorporated
    8. Add the melted chocolate in to the mixture keep mixing
    9. Pour the mixture to the previously lined tin and bake it for 25-30 mins
    10. The Brownie will be cooked when there is a cracked thin surface on top 

    Monday, March 26, 2012

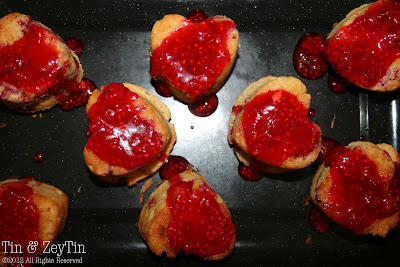
    Rasberry and Lemon Muffins

    These are probably the best looking muffins I have ever made. The juice of the raspberries made them very moist and my friend doesn't really like to have muffins very sweet. So I baked them with less amount of sugar than I normally would, this way you can have loads of it and still wouldn't feel tired of eating them. I mean you can have dozens of it and it wouldn't be too sweet. The flavour of lemon is intense in this muffins, highly recommended if you are a citrus lover. Scroll down for the recipe.


    Ingredients: (yields  12-14  muffins)

    • 1/4 cup brown sugar
    • 1/4 cup granular white sugar (you can use 1/2 cups if you want it to taste more sweet)
    • 1/4 cup lemon juice
    • Zest of 5 lemons approximately 1/3 cup zest
    • 1/4 cup yogurt
    • 1/2 cup milk
    • 1 3/4 cup self raising flour
    • 1 tbsp baking powder
    • 130 grams of frozen raspberries
    • 1 egg
    • 5 grams of vanillia powder (you can use vanillia extract)
    • 1/2 cups of unsalted butter melted


    Icing:

    • 105 grams of frozen or fresh raspberries
    • 4 tbsp icing (powdered) sugar
    • 1 tbsp lemon juice
    Recipe: 
    1. Place the zest of lemons, brown sugar, granular sugar in a bowl or in a mortar
    2. Pestle until everything is incorporated this process will help to extract the essential oils 
    3. Line or grease your muffin tin and set your oven 180 C/ 360 F
    4. Add the egg and whisk it with sugar
    5. add the lemon juice '
    6. vanillia powder whisk it and add the milk and yogurt keep whisking until everything is incorporated
    7. Add the melted butter and whisk until everything is incorporated
    8. In another bowl mix lightly the flour and baking powder
    9. Add the frozen berries to the bowl and coat it with flour 
    10. Add the liquid to the dry mixture mix it with a spatula until flour disappear 
    11. Spoon the mixture to muffin tin
    12. Bake it for 20-30 (mins mine took 20)
    13. After baking let the muffins set for 10 minutes 
    14. In a bowl mix and pestle the icing ingredients and spoon them on top op the muffins and serve it.


    Wednesday, March 21, 2012

    Pasta with Mushrooms, Asparagus, and Fresh Herbs

    I have been cooking pasta for about ten years now. I font even remember how it used to taste like but I probably can not even eat the first pasta I ever cooked. After all we are not all born gifted. Although, pasta is a simple dish to cook in my opinion it is tricky to male one. I manage to get some clues from the itallian fair on how to cook the dry pasta. Apparently for all those years I have been over cooking the pasta and it turns if it is cooked al dente pasta would be more delicious and al dente is also good for your digestive system. You want to have a big pan preferably tall one especially if you are making spaghetti with loads of water to cook the pasta. The pasta should be able to move freely in the pot. You don't want to put oil into the pasta water but you want to add some salt into the water. Also another common mistake is not waiting for the water to boil perfectly. You want the cook the pasta in a boiling  water not hot or warm water. Now I don't want to mislead with saying that I boil my pasta for 5 - 8 mins because there is so many different pasta varieties out there and I don't think I am an authority to make a generalisation on that but I would say make sure it is al dente check the instructions on the pasta package if necessary and taste your pasta to check whether it is done.

    Tips for cooking the dry pasta:

    • use a big pot
    • add good amount of water check the packaging of the pasta for instructions
    • do not add oil to the boiling water
    • add salt before adding dry pasta
    • cook the pasta al dente 


    Pasta
    I was searching on the web for a good mushroom sauce. Most of them are using bacon in the sauce so i decided to add a meaty flavor which in my opinion can be added with using asparagus. And this recipe turned out to be very chili i don't think Italians would appreciate spicy pasta:) The  Crème fraiche  was very sour so to mask its taste i had to add a strong flavor. I would use double cream instead as a sauce.
    Pasta with Mushrooms and Asparagus
    Ingredients : (2 serving ) 
    • Dry spagetti for two (from the instructions on the package split the pasta)
    • 4 button mushrooms
    • 5 chestnut mushrooms
    • 8 asparagus tips
    • 1 spanish onion
    • 3 garlic cloves 
    • 3 tbsp olive oil<\li>
    • 125 ml crème fraiche (i would use single or double cream instead  crème fraiche  was very sour)
    • 1/2 tsp black pepper (optional)
    • 1 bird eye chili (optional)
    • salt for taste 
    • 15 grams of fresh dill for garnish
    • 15 grams of fresh  flat leaf parsley for garnish
    Reci. pe:

    1. put 1 LT water to a large Pam and bring it to boil 
    2. chop the mushrooms and dice the onions 
    3. wash and finely chop the dill and parsley and set aside 
    4. add the olive oil and onions to a nonstick pot, stir and cook until they are brown
    5. add the mushrooms and let it cook until the mushrooms loose their juice 
    6. when the water started the boil add some salt and the dry pasta with the help of a fork twist the pasta into the water
    7. let it cook for 5-8 mins and check it to see if it is done you want it to be cooked al dente 
    8. drain the pasta and set aside
    9. add the cremè   fraiche  or double cream to the mushrooms  and let it boil for 3-5 minutes 
    10. add black peppers and chili to  the sauce
    11. add the pasta into the mushroom sauce and mix let it boil with the sauce for 15 -30 seconds 
    12. boil or steam asparagus until tender, i boiled them for 2-3 mins
    13. serve the pasta in mushroom sauce and place asparagus on top and sprinkle some  dill and parsley

    Ingredients chestnut mushrooms, button mushrooms, asparagus, crème fraiche, onion, garlic, dill, flat leaf parsley

    Tuesday, March 20, 2012

    La Dolce Vita : Itallian Fair for Londoners

    Every year in Islington The Business Center  becomes a host for an event called "La Dolce Vita" meaning sweet life. The event as it's name suggests is an italian fair displaying, promoting, selling the Italian products mainly food and wine products. This year thanks to my lovely Italian friends I went to the fair and had loads of good food. The displayers are either companies/small business owner's based on Italy or london based Italian product providers. Italy is amazingly rich in terms of food and wine culture and La Dolce Vita event is a good option to taste and learn about the food culture in Italy. Now I can not really start conversations and talk about food with strangers and if you are like me i would recommend go to the fair with your Italian friends. My friends were really kind and they explained whatever i asked about the products in the fair so now it is my turn to write about what i learned from the fair and from my friends.
    Buffalo Mozzarella
    Our first stop was a stall serving mainly bufalo mozzarella that has been brought from Naples. The products were not on sale rather the stall was a promotion for a restaurant called "Fratelli La Bufala" that is going to be opened in Piccadilly circus on 27th of March. The Buffalo's milk almost miraculous it is richer in protein, calcium, and fat than cow's milk.  People suffering from intestine problems or eczema find it hard to consume diary products made with cow's milk and when they switch to buffalo milk they start to feel an improvement in their conditions. Lactose intolerance is another common problem, where as buffalo milk is easier to digest. I have never came across to a Buffalo milk in my local grocerry store so I can't tell you what the Buffalo milk tastes like but the  mozzarella we tasted was different in terms of smell and taste from the regular cheese that has been sold in our local grocery stores in UK which is not suppose to be called mozzarella rather it turns out it should have been called fior di latte. Because the mozzarella can only be made from Buffalo milk. The mozzarella we tasted wasn't smelling like milk, that was the first thing I noticed since I am a bit sensitive when it comes to smell of any food (and anything really). In terms of taste it had a spesific sweetness that is in my opinion comming from the milk itself. When I was in States we used to buy this milk called horizon organic and i think the sweetness of the mozzarella reminded me of horizon's taste. The texture was soft felt very natural. Back to the restaurant, they were advertising that they will be bringing the mozzarella from Naples. So i made a small research it turns out in Naples there is water buffalo or  Mediterranean  buffalo farms which is originated from Mainly sub Indian continent. There is regulations in Italy to protect the buffalo cheese from Campania. If a restaurant claiming that they are serving a real Neapolitan pizza, it is against the law in Itally not to use buffalo cheese in the pizza. 

    Sicilian Pesto Stall
    Our next stop was a stall from scilly with pestos for sale. I have bought a broccoli pesto with sun flower seeds, sun-dried tomatoes, olive oil, and  raisins in it, when i first tasted it i thought it was  a familiar taste.I have also bought an interesting sauce with bird eye chillies and sweet marmelade together in one small glass container. Later on my Italian friend told me that they usually eat this sauce with meat. I think the sauce reminded me of Thai food, maybe stir fried noodles with tofu and peanuts on top which taste sweet and spicy at the same time. My friends bought almond and artichoke pesto. Actually i think i will try to make the brocoli pesto later on, and will try the pesto my friends bought as well, with the extra virgin olive oil i bought again produced in Sicily but from the next stall.
    Olive Oil Brought from Different Regions of Italy
    Olive Oil Stall 
    Olive Oil with Gold Flakes
    When we came across the olive oil stall i asked my friend if he can tell the difference between two olive oils and he answered me back yes. When I tasted the olive oils one after another i was surprised by the richness of the taste. I think that was a turning point in my life in terms of olive oil, at that point i was amazed to realize that an olive oil can come up with so many different flavours. All the olive oils was extra virgin olive oil.  Back than I thought there was only two types of olive oil mild and strong and when it is mild that means it is not extra virgin if it is strong that means it is extra virgin and the bitter it is the better extra virgin olive oil. But it turns out this is not the case olive oil can be extra virgin and mild can be fruity and nutty. I think this is just amazing, it is hard to put it in words. The extra virgin olive oil again can be bitter and you can feel the bitternes first or you might not feel the the bitterness until you swallow it  as if it is leaving a bitter trace in your mouth. It is just absolute pleasure i highly recommend you to buy different olive oils ay the same time and maybe make a tasting on your own to experience what i just described. You wont regret it. Oh by the way my fiance tells me there is this restaurants in Europe where there is no lighting and you go in and try dishes. If you cant see anything your sense of taste is going to improve. I am planning to make a blind olive oil tasting on my own to tell the difference. 

    Pistachio Cream an Amazing Alternative to Nutella
    The region called Emilio Romagna is one of the most developed regions in Italy. The region is also known as the inventor of one of the most known Italian desert tiramisu. Although there is a debate about it other regions such as Venetia is  also claiming to be the inventor of the famous tiramisu desert.  Also Parmagiano Reggiano the famous parmesan cheese is coming from this region. The region is also known with meat products. Also in this stall they were selling the balsamic vinegars up to 8 years old which was amazing and expensive:)

    Italy is famous with many dishes and products. When i asked my dearest Italian friends what would they like to add to this list their response was chocolate and coffee. Although Italy is not as famous as Switzerland in terms of chocolate production, Italy is a major player in the history of chocolate in Europe. For example  Tuscany based chocolate brand is the official supplier of Royal Family in UK. Turin region is famous with the hazelnut chocolates called gianduia. An the Sicilia region was the first producer of chocolate bars in Europe. The chocolate bars produced in Sicilia was made of cocoa paste instead of cocoa butter and the sugar crystals were visible. On the other hand coffee is very common in Italy. In Italy every bar suppose to serve coffee; however, Italians have bars dedicated to coffee only, which is not the sense of coffee shop rather you stop by for an espresso and sip it in the bar. And Italian coffee is an absolute joy. I would like to thank my lovely Italian friends for tirelessly telling me about Italian culture and language. 

    Finally, if you want to visit the Italian fair next year keep your tickets and go there both Saturday and Sunday. On Sundays you might get some discounts since the producers wants to get rid of the remaining products. But some products runs out quickly so it is not guarantied that you will get to see or try every product on Sunday so go there both Saturday and Sunday. 

    Emilia Romagna Region 
    Parmesan Cheese

    Balsamic Vinegar
    Ricotta Cheese I bought From Gastronomica stall

    Gastronomica Stall Cheese with Grapes
    Pistachio Gellato and  Choclate Chuncks Gellato 
    Gellato Stall

     Spotted Celebrities
    Gino D'Acampo
    Alessio

    Khaleda

    Oscar

    Paolo  

    Saturday, March 17, 2012

    chocolate muffins with white chocolate chunks and St. Patric's day decorations

    It is a rainy cold day here in London but i think the weather conditions is not going to stop the Britons to celebrate the St. Patric's day. Some weeks ago there was a post in this blog on the pancake day. Let me remind you what pancake day is: during the transition from winter to spring according to the Christianity consumption of some foods such as butter, eggs are restricted for purifying purposes. This time of the year is called lent. However at the St. Patric's day the constraints of the lent is lifted and at the beginning of  the  17th century it became a festive day so it has become another excuse for celebrations.
    Muffin with white chocolate chunks
    Originally St. Patric's day is representing the arrival of Christianity to Ireland however this St. Patric's day is evolved into  a celebration of Irish culture especially in commonwealth countries and USA.  Nowadays during the celebrations wearing green, drinking Guinness beer , and using shamrock as a clothing item became a custom. According to the wikipedia St. Patric arrived to Ireland with a three leaf shamrock representing the trinity. Hence shamrock is the symbol of the St. Patric's day. 
    Dry ingredients, muffin tin, muffins with St. Patric's day decorations

    I was going to bake cupcakes but the feedback i received from friends made me bake muffins instead.  My friends think that the cake of cupcakes are less tastier. But when you are placing the frosting there is a disadvantage associated with muffins since they rise uniformly so you end up with a rough surface. So the icing doesn't look perfect. But the taste is worth it! 


    Ingredients (yields 10 - 12 muffins)

    • 1 cup chopped white chocolate chunks
    • 1 cup milk
    • 1 egg
    • 1/2 cups of butter unsalted
    • 2 tbsp granular sugar
    • 1/4 cups of soft brown sugar
    • 3 tbsp cocoa powder
    • 1 tbsp baking powder
    • 5 grams of vanilla powder (you can alternate this with 1 tsp vanilla extract)
    • 1 3/4 cups self raising flour 


    Recipe

    1. Set the oven to 180 C/ 360 F and line or grease your muffin tin
    2. In a bowl mix the granular sugar, cocoa powder, flour,  baking powder 
    3. Add the chocolate chunks to the mixture mix lightly with a spoon
    4. Crack the egg to another bowl  add the vanilla powder and beat it heavily
    5. Add the butter an sugar to the bowl and beat it with an electric mixer
    6. Add the milk to the mixture and keep beating in medium speed
    7. Add the wet ingredients to the dry ones and mix it lightly with a spatula or spoon until the flour disappears 
    8. Spoon the mixture to the muffin tin
    9. Bake it for 15-30 mins (mine took 20 mins) 
    Icing: 
    • 200 grams of white chocolate
    • 3 tbsp light cream cheese
    • 1 tbsp icing sugar 
    • 1 tbsp green food colouring
    1. Melt the chocolate in a bowl by placing the bowl in a hot water
    2. Dip the top surface of the cooled muffins into the melted white chocolate  
    3. Wait for the chocolate to solidify you can put them into the fridge for 5-10 mins to speed the process
    4. Mix the food colouring , cream cheese, and icing sugar and draw 
    Decorated hearth shaped muffins